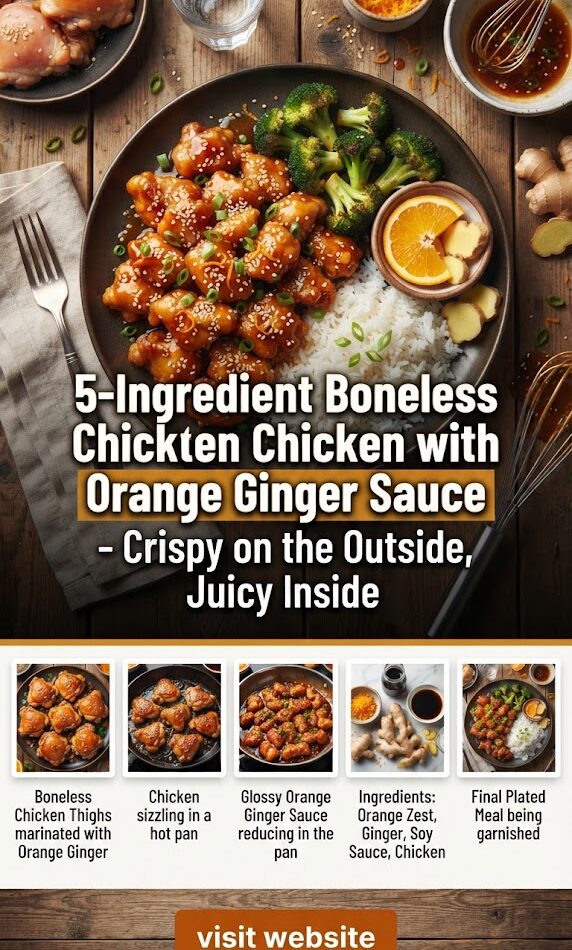
Finding the perfect balance between a quick weeknight dinner and a gourmet culinary experience often feels like a balancing act. We live in a world where time is our most precious commodity, yet our desire for high-quality, flavorful, and healthy meals has never been higher. Enter the 5-Ingredient Boneless Chicken with Orange Ginger Sauce. This dish is a masterclass in minimalism, proving that you don’t need a pantry full of exotic spices to create a meal that rivals your favorite high-end Asian bistro.
In this comprehensive guide, we will explore why this recipe works, the science behind achieving that coveted “crispy-yet-juicy” texture, and how five simple components—chicken, ginger, orange, soy sauce, and starch—transform into a symphony of flavors.
The Magic of Minimalism: Why 5 Ingredients?
The “5-ingredient” movement isn’t just about saving money at the grocery store; it’s about culinary clarity. When you limit the number of ingredients, each component must pull its weight. There is no room for filler.
- The Protein (Boneless Chicken): The canvas of our dish. Whether you choose breast or thigh, the focus is on moisture retention.
- The Zest (Fresh Orange): Provides acidity, natural sweetness, and a bright aromatic profile.
- The Heat (Fresh Ginger): Adds a spicy, woody depth that cuts through the sweetness of the citrus.
- The Umami (Soy Sauce): Provides saltiness and a fermented depth that grounds the brighter notes.
- The Texture (Cornstarch or Arrowroot): The secret to the golden crust and the glossy, thick sauce.
By focusing on these five pillars, you create a dish that is clean, vibrant, and incredibly satisfying.
The Science of Texture: Achieving the Perfect Crunch
The most common complaint with home-cooked boneless chicken is that it either ends up “soggy” or “dry as a bone.” To achieve a restaurant-quality finish—where the sauce clings to a crispy exterior while the interior remains succulent—we must understand a few basic principles of food science.
The Power of Starch
Traditional flour coatings often become heavy and bread-like. By using cornstarch (or arrowroot powder), we take advantage of its high amylose content. When starch hits hot oil, it dehydrates and forms a rigid, brittle structure. This creates a thin, glass-like crunch that stands up to the liquid sauce without immediately turning into mush.
The Maillard Reaction
This is the chemical reaction between amino acids and reducing sugars that gives browned food its distinctive flavor. By searing the chicken over medium-high heat, we aren’t just cooking it; we are developing complex flavor molecules that don’t exist in boiled or poached chicken.
The “Velveting” Effect
While true velveting involves an egg white and oil marinade, our simplified 5-ingredient version uses the moisture from the chicken and the light coating of starch to create a protective barrier. This barrier locks in the natural juices of the meat, ensuring that even lean chicken breast stays tender under the high heat of the pan.
Ingredients: A Deep Dive
To make a 5-ingredient dish truly stand out, the quality of those ingredients matters immensely. Here is what you need to look for when shopping:
1. The Chicken (1.5 lbs)
- Chicken Thighs (Recommended): If you want the juiciest result, boneless, skinless thighs are the way to go. They have a higher fat content, making them more forgiving to cook and much more flavorful.
- Chicken Breast: If you prefer a leaner option, chicken breast works beautifully, but you must be careful not to overcook it. Slice them into uniform, bite-sized pieces to ensure even cooking.
2. Fresh Oranges (2 Large)
- You will need both the juice and the zest. The zest contains the essential oils that provide that signature “orange” fragrance, while the juice provides the liquid base and natural sugars for the sauce. Avoid bottled orange juice if possible, as it lacks the brightness and acidity of fresh fruit.
3. Fresh Ginger (2-inch knob)
- Fresh ginger is non-negotiable. It should be firm to the touch with smooth skin. Grating it fresh allows the juices to mingle with the orange, creating a potent aromatic base. Ginger powder is a poor substitute here; it lacks the “zip” and textural interest of the fresh root.
4. Soy Sauce (1/4 Cup)
- Use a high-quality brewed soy sauce. If you are monitoring your sodium intake, “Less Sodium” versions work perfectly. For a gluten-free version, substitute with Tamari or Coconut Aminos.
5. Cornstarch (1/2 Cup)
- This serves a dual purpose: it coats the chicken for frying and thickens the sauce at the end. It is the key to that “glossy” look seen in professional kitchens.
Step-by-Step Culinary Walkthrough
Step 1: Prep the Chicken
Start by patting your chicken dry with paper towels. Excess moisture is the enemy of crispiness. Once dry, cut the chicken into 1-inch cubes. In a large bowl, toss the chicken with 1/3 cup of cornstarch and a splash of soy sauce. Ensure every piece is evenly coated. The chicken should look slightly “dusty.”
Step 2: The Aromatic Base
Zest one full orange and then juice both oranges. You should aim for about 3/4 cup of juice. Grate the ginger using a microplane or the fine side of a box grater. In a small bowl, whisk the orange juice, orange zest, grated ginger, and the remaining soy sauce. This is your “liquid gold” sauce.
Step 3: Searing for Success
Heat 2-3 tablespoons of a high-smoke-point oil (like avocado, peanut, or vegetable oil) in a large skillet or wok over medium-high heat.
- Pro Tip: Do not overcrowd the pan. If you put too much chicken in at once, the temperature of the oil will drop, and the chicken will steam rather than fry. Cook in two batches if necessary.
- Fry the chicken for 3-4 minutes per side until a golden-brown crust forms. Remove the chicken and set it aside on a wire rack (rather than a paper towel) to keep the bottom from getting soggy.
Step 4: The Sauce Reduction
Wipe out any burnt bits from the pan, but keep the flavorful oils. Pour in your orange-ginger mixture. Bring it to a simmer. In a small cup, mix 1 tablespoon of cornstarch with 1 tablespoon of cold water (this is called a “slurry”). Whisk the slurry into the simmering sauce. Watch as it transforms from a thin juice into a thick, translucent glaze.
Step 5: The Final Toss
Once the sauce is thick enough to coat the back of a spoon, add the crispy chicken back into the pan. Toss quickly—just enough to coat every piece in the sticky orange ginger glaze. Serve immediately to preserve the crunch.
Flavor Chemistry: Why Orange and Ginger?
The pairing of orange and ginger is a classic in many Asian cuisines, and for good reason. It follows the principles of Flavor Pairing, which suggests that ingredients sharing key aromatic compounds blend well together.
- Citral and Limonene: Both orange and ginger contain these compounds. This creates a “bridge” between the fruitiness of the orange and the citrusy undertones of the ginger.
- The Sweet-Heat Balance: The natural sugars in the orange juice caramelize in the pan, providing a sweet foundation. Ginger provides “pungency”—a type of heat that is felt in the back of the throat, which balances the sugar without the need for chili peppers.
- Acidic Brightness: The acidity in the orange juice helps break down the proteins in the chicken, making it feel more tender on the palate while also “cutting” through the richness of the fried coating.
Equipment Needed for Professional Results
You don’t need a high-tech kitchen, but a few specific tools will make this process much easier:
- A Cast Iron Skillet or Carbon Steel Wok: These materials hold heat exceptionally well, which is crucial for getting that initial sear on the chicken.
- A Microplane Grater: This is the best tool for zesting oranges and grating ginger into a fine paste that melts into the sauce.
- A Wire Cooling Rack: Placing fried chicken on a rack allows air to circulate around the entire piece, preventing the bottom from becoming soft.
- A High-Heat Spatula: For tossing the chicken in the sticky sauce without breaking the delicate crust.
Pro Tips for Restaurant-Quality Chicken at Home
- The “Dry” Method: If you have time, coat the chicken in cornstarch and let it sit in the fridge for 20 minutes before frying. This allows the starch to hydrate slightly and stick better to the meat, resulting in a sturdier crust.
- Control the Heat: If the sauce is thickening too fast, add a tablespoon of water or extra orange juice. If it’s too thin, let it simmer for another minute before adding the chicken.
- Oil Choice Matters: Do not use extra virgin olive oil for this recipe. Its smoke point is too low, and it will impart a bitter flavor at the temperatures required for crispy chicken. Stick to neutral oils.
- The Zest Factor: Never skip the zest. Most of the orange flavor is in the skin, not the juice. When zesting, only take the orange part; the white “pith” underneath is bitter.
Healthy Swaps and Dietary Variations
While the base recipe is naturally dairy-free, you can adapt it to fit various dietary needs:
For the Keto/Low-Carb Enthusiast
- Sub the Orange Juice: Use a combination of orange extract, water, and a keto-friendly sweetener (like Erythritol or Allulose).
- Sub the Cornstarch: Use Xanthan Gum (just a tiny amount!) to thicken the sauce and skip the coating on the chicken, opting for a hard sear instead.
For the Gluten-Free Diner
- The recipe is almost naturally gluten-free. Just ensure you use Tamari or Coconut Aminos instead of traditional soy sauce, which contains wheat.
The Air-Fryer Version
- If you want to reduce the oil, coat the starched chicken with a light spray of oil and air-fry at 400°F (200°C) for 12-15 minutes, shaking halfway through. Toss with the stovetop-prepared sauce at the end.
Perfect Pairings: What to Serve with Orange Ginger Chicken
A dish this flavorful deserves sides that complement its profile without competing for attention.
1. The Grains
- Jasmine Rice: The floral aroma of Jasmine rice is the classic partner for citrusy dishes.
- Brown Rice or Quinoa: For a nuttier flavor and extra fiber.
- Cauliflower Rice: A great low-carb vessel that soaks up the extra orange ginger sauce beautifully.
2. The Greens
- Steamed Bok Choy: Its mild flavor and crunchy stalks provide a great textural contrast.
- Garlic Sautéed Broccoli: The “trees” of the broccoli are perfect for catching the sticky sauce.
- Snap Peas: Add a fresh, sweet crunch to the plate.
3. The Toppings (Optional)
While not part of the 5 ingredients, these additions can elevate the presentation:
- Toasted Sesame Seeds: For a nutty crunch.
- Sliced Green Onions: For a pop of color and a mild onion bite.
- Red Chili Flakes: If you want to add a “kick” to the “sweet and heat” profile.
Storage, Reheating, and Meal Prep Strategy
This 5-ingredient chicken is an excellent candidate for meal prep, though some considerations must be made for the texture.
Storage
Store the cooked chicken in an airtight container in the refrigerator for up to 4 days. If you are meal prepping for the week, consider storing the sauce and the fried chicken separately, then combining them when you reheat.
Reheating for Best Texture
- Avoid the Microwave: Microwaving fried chicken will make it rubbery and the coating soggy.
- The Oven/Toaster Oven: Place the chicken on a baking sheet at 350°F (175°C) for 5-10 minutes. This will help re-crisp the exterior.
- The Air Fryer: Reheating for 3-4 minutes at 350°F is the absolute best way to bring back that original “just-cooked” crunch.
Freezing
You can freeze the fried chicken (before tossing in sauce) for up to 2 months. To serve, reheat the chicken in the oven from frozen and toss with a freshly made batch of orange ginger sauce.
Common Pitfalls and How to Avoid Them
1. The Sauce is Too Salty
This usually happens if the soy sauce reduces too much. If this occurs, balance it out with a splash of water or a teaspoon of honey/maple syrup.
2. The Coating is Falling Off
This happens if the pan wasn’t hot enough or if you tried to flip the chicken too early. Let the chicken sit undisturbed for at least 3 minutes to allow the crust to set.
3. The Ginger is Overwhelming
Ginger strength varies. If you are sensitive to heat, start with a 1-inch knob instead of 2. You can always add a pinch of ginger powder later, but you can’t take the fresh ginger out once it’s in the sauce!
4. The Chicken is Tough
This is a sign of overcooking. Chicken breast only needs to reach an internal temperature of 165°F (74°C). Since the pieces are small, they cook very fast. Keep a close eye on the clock!
The Nutritional Profile: Why This Recipe is a Winner
Beyond the taste, the 5-Ingredient Boneless Chicken with Orange Ginger Sauce offers several health benefits that make it a guilt-free addition to your rotation.
- Immune-Boosting Ginger: Ginger contains gingerol, a substance with powerful anti-inflammatory and antioxidant properties. It’s long been used to aid digestion and fight the common cold.
- Vitamin C from Oranges: Using fresh orange juice and zest provides a natural boost of Vitamin C, which is essential for skin health and immune function.
- High Protein, Low Fat: By using boneless chicken and a thin starch coating rather than a thick batter, you get a high-protein meal that is significantly lower in calories than traditional “Orange Chicken” found in fast-food courts.
- No Refined Sugars: Most commercial orange sauces are packed with high-fructose corn syrup or white sugar. This recipe relies on the natural fructose in the orange juice, making it a much better option for blood sugar management.
Elevating the Experience: The Art of the Garnish
Even a 5-ingredient meal can look like a $30 entree with the right presentation.
- The Height Factor: When plating, pile the chicken high in the center of the rice or greens rather than spreading it out. This creates visual interest.
- Color Contrast: The deep orange-brown of the chicken looks stunning against bright green scallions or blanched broccoli.
- The Final Drizzle: Save a tablespoon of the sauce (before it thickens too much) to drizzle around the plate for a professional “finished” look.
Frequently Asked Questions (FAQ)
Can I use frozen chicken?
Yes, but ensure it is completely thawed and dried. Frozen chicken releases a lot of water as it thaws, which will prevent the cornstarch from sticking and the chicken from crisping.
What if I don’t have cornstarch?
You can use potato starch or arrowroot powder as a 1:1 substitute. All-purpose flour can be used in a pinch, but the texture will be heavier and less “crunchy.”
Is this recipe spicy?
The heat comes entirely from the ginger. It is a “warm” heat rather than a “burning” heat. If you like it spicy, feel free to add a teaspoon of Sriracha or dried chili flakes to the sauce.
Can I make this with other proteins?
Absolutely. This sauce works wonders on:
- Shrimp: Cook for only 1-2 minutes per side.
- Tofu: Use extra-firm tofu, press out the water, and coat in starch exactly like the chicken.
- Pork Tenderloin: Slice into thin medallions for a quick-cooking alternative.
How do I get more juice out of my oranges?
Before cutting the oranges, roll them firmly against the kitchen counter with the palm of your hand for 10-15 seconds. This breaks the internal membranes and allows more juice to flow.
Conclusion: Why You Should Make This Tonight
The 5-Ingredient Boneless Chicken with Orange Ginger Sauce is more than just a recipe; it’s a strategy for better living. It proves that you don’t need to sacrifice flavor for speed, or health for satisfaction. By mastering the simple technique of starch-coating and the balanced pairing of citrus and spice, you unlock a versatile cooking method that can be adapted to hundreds of different ingredients.
Whether you are cooking for a family of four, prepping meals for a busy work week, or looking to impress a date with your culinary prowess, this dish delivers on every front. It is crispy, juicy, tangy, and sweet—all while maintaining a clean, short ingredient list that you can feel good about eating.
So, grab a couple of oranges, a knob of ginger, and some chicken, and transform your kitchen into the best restaurant in town tonight. Your taste buds—and your schedule—will thank you.