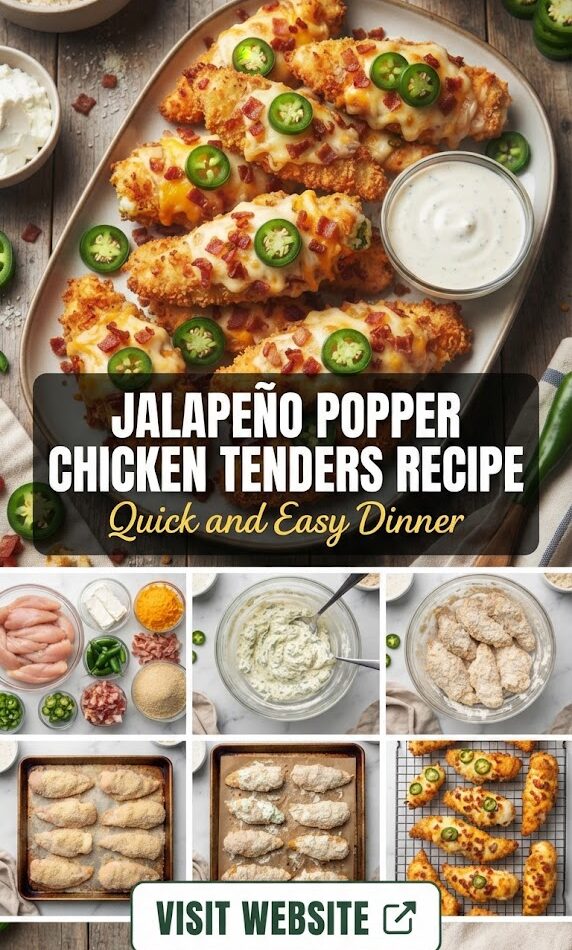
There is a culinary magic that happens when two world-class comfort foods collide. On one hand, you have the jalapeño popper—a staple of American bar food, known for its spicy kick, creamy center, and salty bacon wrap. On the other hand, you have the chicken tender—the undisputed king of weeknight dinners, beloved by children and adults alike for its crunchy exterior and juicy interior.
When you fuse these two together, you get the Jalapeño Popper Chicken Tender. This isn’t just a recipe; it’s a flavor revolution. It’s the answer to the “What’s for dinner?” dilemma when you want something that feels like a gourmet treat but requires the effort of a standard weeknight meal. In this comprehensive guide, we are going to dive deep into how to create the perfect Jalapeño Popper Chicken Tenders, exploring various cooking methods, ingredient substitutions, and the secrets to achieving that elusive “perfect crunch.”
The Anatomy of the Perfect Jalapeño Popper Chicken Tender
To understand why this dish works, we have to look at the flavor profiles. A successful dish relies on the balance of four pillars: Heat, Fat, Salt, and Acid.
- Heat: Provided by the fresh jalapeños. Depending on how you prep them, you can have a mild hum or a fiery blast.
- Fat: The cream cheese and cheddar cheese provide a rich, velvety mouthfeel that coats the palate and tempers the spice of the peppers.
- Salt: Found in the seasoning of the breadcrumbs and the natural salinity of the cheeses (and bacon, if you choose to include it).
- Acid/Crunch: The crispy Panko coating provides the structural integrity, while a squeeze of lime or a side of ranch adds that necessary hit of brightness.
By combining these elements into a single chicken tender, you create a multi-textured experience that hits every taste bud.
Ingredients: What You’ll Need for Success
Quality ingredients are the foundation of any great meal. For these tenders, you want to ensure your chicken is fresh and your produce is vibrant.
The Protein
- Chicken Tenders (1.5 lbs): You can buy pre-cut “tenderloins” or slice whole chicken breasts into strips. Tenderloins are naturally more succulent because they are a specific muscle that doesn’t get much exercise.
- Bacon (Optional but Recommended): 6-8 slices of center-cut bacon, cooked until crispy and finely crumbled.
The “Popper” Filling & Coating
- Cream Cheese (8 oz): Softened to room temperature. This is the “glue” that holds the flavor together.
- Sharp Cheddar Cheese (1 cup): Freshly grated is better than bagged, as it melts more smoothly without the added anti-caking starches.
- Fresh Jalapeños (3-4): De-seeded and finely minced. If you like it hot, keep some of the white pith and seeds.
- Garlic Powder & Onion Powder (1 tsp each): For depth of flavor.
- Smoked Paprika (1/2 tsp): To add a hint of wood-fired essence.
The Breading Station
- All-Purpose Flour (1/2 cup): To dry the chicken and help the binder stick.
- Eggs (2 large): Beaten well; this acts as the “glue.”
- Panko Breadcrumbs (2 cups): Panko is superior to traditional breadcrumbs for this recipe because the larger flakes create more surface area for crunch.
- Salt and Black Pepper: To taste.
Step-by-Step Instructions: The “Stuffed” vs. “Topped” Method
There are two primary ways to make these. The Stuffed Method involves slicing a pocket into the chicken, while the Topped Method involves layering the popper mixture on top of the chicken before breading. For a quick and easy dinner, we will focus on the Integrated Breading Method, which is the most efficient for home cooks.
Step 1: Prep the Chicken
Pat your chicken tenders dry with paper towels. This is a crucial step—excess moisture will cause the breading to steam rather than fry, resulting in a soggy tender. Season the raw chicken lightly with salt and pepper.
Step 2: Create the Jalapeño Popper Mixture
In a medium bowl, combine the softened cream cheese, shredded cheddar, minced jalapeños, crumbled bacon, garlic powder, onion powder, and smoked paprika. Use a fork to mash it all together until it forms a thick, spreadable paste.
Step 3: The Coating Process
- Flour: Dredge the chicken tender in flour, shaking off the excess.
- The Mix: Carefully coat the top of the chicken with a generous layer of the cream cheese/jalapeño mixture. Press it down so it adheres to the flour.
- The Egg Wash: Dip the entire “loaded” tender into the beaten eggs.
- Panko: Press the tender into the Panko breadcrumbs, ensuring the cream cheese side is well-covered. The crumbs will stick to the cheese mixture, creating a protective crust.
Step 4: Cooking to Perfection
Method A: The Oven-Baked Approach (Healthier)
Preheat your oven to 400°F (200°C). Place a wire rack over a baking sheet. This allows hot air to circulate under the chicken, ensuring the bottom gets as crispy as the top.
- Time: Bake for 18–22 minutes.
- Pro Tip: Spray the tenders with a light coating of olive oil spray before putting them in the oven to help the Panko turn golden brown.
Method B: The Air Fryer (The Modern Favorite)
The air fryer is arguably the best way to cook these. It mimics deep-frying with a fraction of the oil.
- Temp: 375°F.
- Time: 12–15 minutes, flipping halfway through (be gentle so the cheese doesn’t fall off).
- Pro Tip: Don’t overcrowd the basket. Air needs to move to create the “crunch.”
Method C: Pan-Searing (The Decadent Choice)
Heat 1/2 inch of neutral oil (like canola or vegetable) in a large skillet over medium-high heat.
- Time: 4-5 minutes per side until the internal temperature reaches 165°F.
- Pro Tip: Use a splatter screen; the moisture in the jalapeños can cause the oil to pop.
The Science of the Scoville: Managing the Heat
The most common complaint with jalapeño-based dishes is that they are either “too spicy” or “not spicy enough.” Understanding the jalapeño is key.
- The Striations: When picking jalapeños at the grocery store, look for “stretch marks” or white lines on the skin. These indicate an older pepper that has endured more stress, which usually means it is significantly hotter. Smooth, bright green peppers are generally milder.
- The Seeds vs. The Membrane: Most of the capsaicin (the spicy chemical) is located in the white pith/membrane, not the seeds themselves. If you want a mild flavor, scrape out every bit of the white ribbing.
- The Dairy Buffer: Luckily, this recipe contains cream cheese and cheddar. Casein, a protein found in dairy, acts as a natural detergent against capsaicin, breaking it down and washing it away from your pain receptors. This is why “popper” flavors are so popular—you get the flavor of the pepper without the lingering burn.
Why This Recipe is a “Google-Ranked” Winner for Busy Families
When looking for recipes online, most people search for three things: Efficiency, Flavor, and Accessibility.
- Efficiency: This meal goes from fridge to table in under 40 minutes. If you use an air fryer, you’re looking at even less active time.
- Flavor: It hits the “comfort food” notes that Americans crave—cheesy, salty, and fried—while providing a sophisticated spicy kick.
- Accessibility: Every ingredient can be found at a local Walmart, Kroger, or Aldi. There are no “exotic” ingredients that require a trip to a specialty grocer.
Keto and Low-Carb Variations
For those following a ketogenic lifestyle, this recipe is incredibly easy to adapt. The core components—chicken, cheese, and jalapeños—are already keto-friendly.
- The Swap: Replace the flour and Panko breadcrumbs with crushed pork rinds or almond flour mixed with grated parmesan cheese.
- The Result: You get an even higher fat-to-carb ratio and an incredibly savory, salty crust that mimics the crunch of Panko perfectly.
- Baking Tip: Pork rind breading browns very quickly, so keep an eye on the oven to prevent burning.
Gluten-Free Alternatives
To make this recipe gluten-free, simply:
- Use a 1-to-1 gluten-free flour blend for the initial dredge.
- Swap Panko for gluten-free breadcrumbs or even crushed gluten-free cornflakes for extra crunch.
- Ensure your bacon and spices are certified gluten-free, as some brands use wheat-based anti-caking agents.
Side Dish Pairings: What to Serve with Jalapeño Popper Tenders
While these tenders are a meal unto themselves, pairing them with the right sides can elevate the experience.
1. Cool and Refreshing: Cilantro Lime Slaw
A vinegar-based slaw with plenty of fresh cilantro and lime juice provides a sharp contrast to the heavy cream cheese and fried coating.
2. The Classic: Sweet Potato Fries
The sweetness of the potatoes complements the spicy jalapeño. Serve with a side of chipotle mayo for a cohesive flavor profile.
3. Light and Green: Roasted Broccolini
A simple side of roasted broccolini with garlic and lemon zest adds a healthy, fibrous component to the meal without overpowering the main event.
4. Dipping Sauces
- Buttermilk Ranch: The classic choice to cool down the heat.
- Blue Cheese Dressing: For those who like a funkier, bolder pairing.
- Hot Honey: A drizzle of honey infused with chili flakes adds a “sweet heat” dimension that is very trendy in US gastropubs right now.
Tips for the Perfect Crunch
If you’ve ever made breaded chicken only to have the coating fall off, follow these pro tips:
- The Double-Dredge: If you want an extra-thick crust, go from Flour -> Egg -> Flour -> Egg -> Panko. It’s more work, but the “shell” it creates is indestructible.
- The Chill Factor: After breading your chicken, place the tenders on a plate and refrigerate them for 15-30 minutes before cooking. This helps the protein in the egg set and “locks” the breading onto the chicken.
- Oil Temperature: If pan-frying, ensure the oil is between 350°F and 375°F. If the oil is too cold, the breading will soak it up and become greasy. If it’s too hot, the outside will burn before the chicken and cheese are cooked through.
Storage and Reheating Instructions
Jalapeño Popper Chicken Tenders are best served fresh, but they do make excellent leftovers if handled correctly.
- Storage: Keep in an airtight container in the refrigerator for up to 3 days.
- Reheating (The Golden Rule): Never use the microwave. The microwave will turn the cream cheese into liquid and the breading into mush.
- The Best Way to Reheat: Use the Air Fryer at 350°F for 4–5 minutes or the oven at 375°F for 10 minutes. This will re-crisp the Panko and gently melt the cheese again.
Nutritional Breakdown (Per Serving)
Note: Estimates based on 4 tenders per serving.
- Calories: 450 kcal
- Protein: 38g
- Fat: 22g
- Carbohydrates: 24g (Lower if using keto breading)
- Fiber: 2g
- Sugar: 3g
This dish is a high-protein powerhouse. While the cheese and breading add calories, the high protein content from the chicken ensures you stay full for longer, making it a satisfying dinner option.
The History and Popularity of Jalapeño Fusion Foods
The jalapeño popper itself is a descendant of the chile relleno, a Mexican dish consisting of a large roasted poblano pepper stuffed with cheese and meat, then fried in a thick egg batter. As the dish moved north into Texas and the Southwest, it was adapted into the bite-sized appetizer we know today.
In the United States, the “Jalapeño Popper” flavor profile became a cultural phenomenon in the 1990s and early 2000s, appearing in everything from potato chips to hamburgers. The reason for its endurance is simple: it hits the “craveability” index. Humans are biologically wired to enjoy the combination of high-fat foods (cheese) and mild irritants (capsaicin), which trigger a minor endorphin rush. By applying this to chicken tenders, we are essentially creating the “Perfect American Meal.”
Common Mistakes to Avoid
- Using Cold Cream Cheese: If the cream cheese isn’t soft, it won’t mix with the jalapeños and cheddar. You’ll end up with chunks of plain white cheese rather than a uniform flavor.
- Chopping Jalapeños Too Large: If the pepper chunks are too big, they won’t soften during the short cooking time, and you’ll get an unpleasant raw “crunch” in the middle of your tender.
- Not Seasoning the Flour: Many people forget that every layer of the breading station needs seasoning. Add a pinch of salt to your flour and your Panko to ensure the flavor is built from the inside out.
- Overcooking the Chicken: Chicken tenders are thin. Once they reach an internal temperature of 165°F (74°C), take them out. Every degree over that makes the meat dryer.
Frequently Asked Questions (FAQ)
Can I use pickled jalapeños instead of fresh?
Yes! Pickled jalapeños add a nice acidity and saltiness. However, make sure to pat them extremely dry with paper towels, or the moisture will cause the cream cheese mixture to slide off the chicken.
Can I freeze these before cooking?
Absolutely. This is a great “meal prep” recipe. Bread the chicken, place them on a parchment-lined tray, and freeze until solid. Then, transfer them to a freezer bag. You can cook them straight from frozen—just add 5-8 minutes to the cooking time.
How do I stop the cheese from leaking out?
A little leakage is normal, but to minimize it, ensure the Panko coating is thorough. The breadcrumbs act as a barrier. Also, using a wire rack in the oven helps “set” the bottom before the cheese gets too runny.
What’s the best way to mince jalapeños without burning my hands?
Wear disposable kitchen gloves! If you don’t have gloves, rub a little bit of vegetable oil on your hands before cutting. The oil creates a barrier. Most importantly, never touch your eyes or face after handling peppers until you’ve washed your hands with grease-cutting dish soap.
Final Thoughts: The Ultimate Crowd-Pleaser
The Jalapeño Popper Chicken Tender is more than just a quick dinner; it’s a versatile recipe that fits almost any occasion. Whether you’re hosting a Super Bowl party, looking for a way to spice up your meal prep, or trying to convince your kids to try something other than plain nuggets (just leave out the seeds for them!), this dish delivers.
The combination of the succulent chicken, the melt-in-your-mouth cheese, and the crisp, golden-brown crust is a testament to the power of simple ingredients treated with care. By following the tips and techniques outlined in this guide, you’ll be able to produce restaurant-quality results in the comfort of your own kitchen.
Give this recipe a try tonight, and don’t be surprised when it becomes a permanent fixture in your monthly meal rotation. It’s bold, it’s crunchy, it’s cheesy—it’s everything a dinner should be.
Summary Checklist for Success
- Pat chicken tenders dry.
- Soften cream cheese to room temperature.
- Finely mince jalapeños (de-seed for less heat).
- Use Panko breadcrumbs for maximum crunch.
- Season every layer (Chicken, Flour, Crumbs).
- Use a wire rack if baking in the oven.
- Use a meat thermometer to hit 165°F.
- Let the tenders rest for 2-3 minutes before serving to let the cheese set.